
You can remove dents in your vehicle yourself professionally and inexpensively. Outlined below are a few methods for fixing dents in your vehicle. The automobile paintless dent repair process, tools, and materials required for each of the projects or methods below are clearly identified. The amount of time and effort really depends on the type of dent that you have. The paintless dent repair procedures below fall into two categories:

Click Below for Step-by-Step Instructions – Six Methods for Paintless Dent Repair
1. Minor Dents – dents that can be removed without using body filler or paint (also referred to as Paintless Dent Repair or PDR).
Minor Dent Repair: Method One (Using a Uni-Vac DTK 7700 Pulling Tool)
Step 1 – Choose the Correct Size Suction Cup
- Examine the size of the dent and then choose the appropriate sized suction cup for the Uni-Vac DTK 7700 Pulling Tool (pictured right).
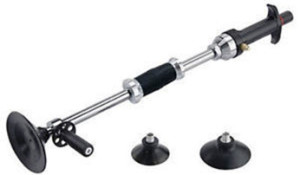
Uni Vac Dent Puller H-S DTK-7700

Step 2 – Position Suction Cup over Dent
- Carefully position the Uni-Vac DTK 7700 Pulling Tool over the dent and press very firmly.

Step 3 – Tighten the Air Pressure Valve
- Screw the air pressure valve very tight to allow no air to escape.

Step 4 – Start to Depress the Air Pressure Pump
- Start to pump / depress the air pressure pump until the red line disappears.
- Once the red line disappears after pumping it is an indication that the proper amount of suction has been achieved to pull out the dent.

Step 5 – Use the Slide Hammer to Start pulling out Dent
- Use the slide hammer to start pulling out the dent.

Step 6 – Release Air Pressure Valve and Remove Tool
- When you have finished pulling out the dent with the slide hammer release the air pressure valve.
- Remove the Uni-Vac DTK 7700 Pulling Tool from the surface.
- Your dent should now be popped out.

Minor Dent Repair: Method Two (Using a Suction Cup)
Step 1 – Assess Dent Damage
- Most minor dents are removable.
- If they are not creases or in rolled portions of the body such as corners or edges they can be removed easily with a Suction Cup dent puller.
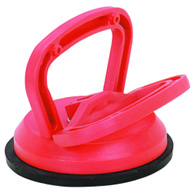
Suction Cup Puller HF 40993

Step 2 – Place Film of Water on Inside Edge of Suction Cup
- Place a film of water around the inside edge of the Suction Cup with your finger.
- The water helps to ensure a seal between the cup and the metal.

Step 3 – Position the Suction Cup
- Position the Suction Cup over the center of the dent.
- Press down and up slightly on the handle to create a vacuum between the dent and the cup.

Step 4 – Start to Depress the Air Pressure Pump
- Push down and pull out to “vacuum” the dent from the metal.
- This may require several attempts, but you should eventually be able to pop the dent out.

Minor Dent Repair: Method Three (Using a Cross Bar Dent Puller)
Step 1 – Assess Dent Damage
- Most minor dents are removable.
- If they are not creases or in rolled portions of the body such as corners or edges they can be removed easily with a Cross Bar dent puller (pictured right).
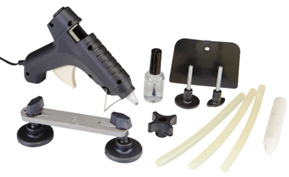
Cross Bar Kit HF 66957

Step 2 – Warm Glue and Clean Dent Area
- Start warming up the glue by inserting Glue Sticks into the Glue Gun. Allow for Glue Gun to heat Glue Sticks for 10 to 15 minutes.
- Using a clean Disposable Wipe, clean the dent area with the Release Agent that comes with the kit.

Step 3 – Apply Heated Glue to Pull Tab
- Apply heated glue from the Glue Gun and melted Glue Sticks to one of the two Pull Tabs included in the kit (determine what size Pull Tab you need).

Step 4 – Place Pull Tab on Center of Dent
- Gently place the Pull Tab with glue directly in the center of the dent.
- Be careful not to push the Pull Tab against the dent very hard against the surface (you will push out the glue and create a weaker bond with the surface).

Step 5 – Place the Cross Bar over the Pull Tab
- Place the Cross Bar over the Pull Tab.

Step 6 – Attach Wing Nut and Turn
- Attach the Wing Nut to the threaded end of the Pull Tab and start to turn.
- Continue to turn until the dent is raised.
- Unthread Wing Nut and remove Cross Bar and Pull Tab from the surface.
- You can use the Release Agent and Plastic Razor Blade to help remove glue residue from surface.

Step 7 – Repeat until Satisfied
- You may have to repeat steps 2 through 6 a couple times before the dent is raised to a satisfactory level.

Minor Dent Repair: Method Four (Using a Glue Pulling Slide Hammer)
Step 1 – Clean Surface, Apply Glue to Pull Tab
- Clean the surface of the dented area with Release Agent to remove any dirt or wax.
- Using the Glue Gun, apply melted Glue Sticks to Pull Tab.
- Make sure melted Glue Sticks are not scalding hot to prevent damage to paint.
- If melted Glue Sticks are too hot, allow them to cool for about 10 seconds on the Pull Tab before you apply the Pull Tab to the vehicle panel.

Step 2 – Apply Pull Tab to Center of Dent
- Apply Pull Tab to the center of the dent.
- Do not apply too much pressure when applying the Pull Tab or you will create too thin of a layer of glue between the car panel and the Pull Tab.
Helpful Tip: The larger the dent the larger the diameter pulling Pull Tab you should use. If you do have trouble getting the tab to stick when pulling you may need to increase the size of the Pull Tab you are using.

Step 3 – Attach Glue Pulling Slide Hammer to Pull Tab
- Let the glue cool for about 45 – 60 seconds (glue should be hard when fully cooled).
- Place the tip of the Glue Puller Slide Hammer (pictured right) under the Pull Tab and turn to lock in securely to the Pull Tab.
- Swivel the tip so that the tips are facing right or left.

Step 4 – Pull out Dent
- When using a larger Pull Tab, slide the weight of the Glue Pulling Slide Hammer towards you without much pressure. Let the weight do the work. Use several short and quick pulls instead of one large pull.
- When using the smaller Pull Tab, give a quick strong pull as the smaller Pull Tab will usually break loose on the first pull.
- After each pull spray or wipe some Release Agent on the both the Pull Tab and the panel and remove excess glue left behind with a Plastic Razor Blade.
- Repeat as needed.

Step 5 – Remove Glue Residue and Pull Tab
- To remove the Pull Tab from the surface after pulling is done, spray the Pull Tab with Release Agent and give it one hard pull to remove the Pull Tab.
- Using Release Agent and a Plastic Razor Blade, clean the surface of any remaining glue residue.

Step 6 – Tap down High Spots, Repeat if Necessary
- Tap down any high spots with the Plastic Knock Down Peg and Rubber Mallet.
- Repeat the process as needed. Most dents require several pulls.

2. Major Dents – dents that can be repaired without replacing sheet metal but will require body filler and paint.
Major Dent Repair: Method One (Pulling Damage with a Slide Hammer and Pull Rods)
Step 2 – Clean the Repair Area
- Spray or Wipe the entire area with Wax and Grease Remover and wipe dry with a clean Disposable Wipe. This eliminates any built-up wax, grease, silicone, road tar, etc., that could cause paint failure.

Step 3 – Make 1/8 Inch Holes along the Dent or Crease
- If the dent is in an inaccessible area, or too deep or creased to simply bang out from behind, punch or drill a series of 1/8-inch diameter holes along the crease line or in the deepest portion of the dent. You can use a Drill or Center Punch and Hammer to make the holes.
Helpful Tip: If you do not want to drill holes then see Welding Stud Pull Pin (Method Two).

Step 4 – Pull the Dent Out with Slide Hammer
- Screw the Slide Hammer tip into the hole in the shallowest portion of the dent and pull the dent out.
- Do not pull too hard and create a “reverse dent” where the surface is raised higher than it was originally.
- It helps to tap along the edge of the dent with a Body Hammer as you operate the Slide Hammer – this will help relieve tension in the metal and “pop” the sheet metal back into its original shape.

Step 5 – Pull the Dent out further with Pull Rods
- Once you have pulled the dented area up near the original body contour with a Slide Hammer, you can use Pull Rods to make more precise changes in the shape of the metal.
- You simply inset the Pull Rods into the 1/8 drilled holes and pull with one hand while using a Body Hammer with the other hand to help tap along the edge of the dent to relieve metal tension and pull the dent out to the original body contour.

Step 6 – Sand Paint Down to Bare Metal
- After you have pulled out the dented area close to the original contour of the metal, sand the paint down to bare metal using either a DA Sander with 80 Grit Sandpaper Disc, a Drill with 3 Inch 80 Grit Sandpaper Disc or by hand with 80 Grit Production Paper and a Sanding Block.
- When sanding away the paint, the disc will probably reveal any major high or low spots in the metal. You can tap the high spots down gently with a Body Hammer.

Step 7 – Feather Edge Paint
- Featheredge / taper the paint out at least one inch around the dented area using either a DA Sander with 120 Grit Sandpaper Disc, a Drill with 3 Inch 120 Grit Sandpaper Disc or by hand with 120 Grit Production Paper and a Sanding Block.
Helpful Tip: You should plug the drilled holes with Solder and Soldering Iron if possible and then sand Solder smooth before applying Body Filler.

Step 8 – Check Panel and Clean
- Use your hand to check the contour of the metal and make sure you don’t have spots that are either too high or too low.
- Tap down high spots with a Body Hammer and pull out low spots with Pull Rods.
- Spray or Wipe the entire area with Wax and Grease Remover and wipe dry with a clean Disposable Wipe. This eliminates any built-up wax, grease, silicone, road tar, etc., that could cause paint failure.

Step 9 – Mix and Apply Body Filler
- Mix Body Filler with Body Filler Hardener on a Mixing Board according to product directions (if not mixed properly you will have to remove and start over).
- Use a Body Filler Spreader to apply Body Filler as level as possible. The Body Filler will start to harden fairly quickly.

Step 10 – Use Surform File to Shape Body Filler
- Before the Body Filler hardens, use a Surform File (also called a cheese grater) to start shaping the Body Filler to match the contour of the vehicle surface.

Step 11 – Sand Body Filler
- After the Body Filler has hardened, use a Sanding Block with 80 Grit Production Paper to rough sand the Body Filler to match the contour of the vehicle surface.
- Switch to 180 Grit Production Paper to more finely sand the Body Filler to further match the contour of the vehicle surface.
- Feather / taper the edges of the Body Filler right up to the painted edge.

Step 12 – Apply Primer
- Use Tape and Masking Paper to mask off and protect any areas that you want to avoid getting overspray on, including tires.
- Apply 2 to 3 medium coats of Primer using a Spray Gun, Aerosol Can, Preval Sprayer or Spra Tool.

Step 13 – Use Putty to Fill Scratches, Pin Holes, and Defects
- Use Body Putty to fill any deep scratches, pin holes or other surface defects that you may see in the Body Filler or body work.
- Spread Body Putty over the Body Filler with a Body Filler Spreader.
- Allow Body Putty to dry approximately 15 minutes @ 70°
- Once Body Putty is completely dry, sand with 180 Grit Production Paper.
- Reapply 2 to 3 medium coats of Primer and let dry for approximately 30 minutes @ 70°

Step 14 – Final Sand Primer
- Dry sand the Primer smooth with 320 Grit Production Paper or wet sand with 320 Grit Wetordry Sandpaper.
- Remove any remaining scratches.

Step 15 – Prepare the Blend Area or Panel
- Dry sand the blend area with 800 Grit Production Paper or wet sand with 800 Grit Wetordry Sandpaper.
- For blending, you can also use Rubbing Compound by hand to compound about 10 to 15 inches beyond the repair area.
- If you are going to paint the entire panel, then dry sand the entire panel with 800 Grit Production Paper or wet sand with 800 Grit Wetordry Sandpaper.

Step 16 – Tape, Wipe Clean, and Tack Surface
- Use Tape and Masking Paper to mask off and protect any areas that you want to avoid getting overspray on, including tires.
- Spray or Wipe the entire area with Wax and Grease Remover and wipe dry with a clean Disposable Wipe.
- Just prior to painting use a Tack Cloth to lightly tack off area and remove any dust or debris from the surface.

Step 17 – Apply Color and Clear
- Apply 2 to 3 medium wet coats of Base Color over the primed area (do not spray Base Color too wet).
- Extend each coat about an inch past the previous coat.
- Spray until the repair area is covered and you have a uniform finish (not blotchy looking).
- Spray 2 to 3 medium wet coats of Clear over the Base Color.
- Spray Clear over the entire panel or spray Clear over the repair area and use Edge Blender to melt the dry edge of the Clear.
- After Clear has dried (overnight) you can gently wet sand any defects with very fine 1500 Grit Wetordry Sandpaper and then use Rubbing Compound and Polish to restore gloss.

Major Dent Repair: Method Two (Pulling Damage with Welding Stud Pull Pins)
Step 2 – Remove all Paint from Dented Area
- Remove paint around the dented area down to bare metal using either an Air Grinder and 36 Grit Grinding Disc or a Drill with 3 Inch 36 Grit Grinding Disc or by hand with 36 Grit Production Paper and a Sanding Block.

Step 3 – Use Stud Welder to Weld Stud Pins to Bare Metal
- To use the Stud Gun, insert 2.2 mm Copper-Plated Stud into the tip and then press tip of Stud Gun against the bare steel.
- Squeeze and release the trigger very quickly. When the trigger is squeezed, electric current flows through the tip and fuses the stud to the car body. The longer you hold the trigger, the stronger the welding stud will bond to the metal (and the tougher it will be to remove), When you rapidly squeeze and release, you will be able to remove the stud by hand instead of grinding it off with a grinder.
- Weld a few studs to the deepest part of the dent.

Step 4 – Pull the Stud Pins to Pull Out Dent
- You can use a number of different stud pulling tools to grab the welded 2.2 mm Copper-Plated Stud and start to pull out the dent.
- Pictured here is the Ding-Near-Perfect Puller tool.
- Place the Ding-Near-Perfect Puller cone over the Pin, tight against the panel.
- Gently squeeze the handle while watching the metal through the side of the cone.
- Raise the dent up so it is level with the surrounding surface, or slightly higher.
Helpful Tip: There are other stud pin pullers available in addition to the Ding-Near-Perfect Puller tool including a Stud Pin Pulling Slide Hammer, Mini Puller, Stud Buddy and Stud Lever.

Step 5 – Remove Stud Pin
- Remove the 2.2 mm Copper-Plated Stud by gently bending it back and forth with your hand.
- If stud pin does not remove easily, you will have to cut it and then grind it off of the metal surface with an Air Grinder and 80 Grit Grinding Disc or a Drill with 3 Inch 80 Grit Grinding Disc (grind at slower speeds to avoid over heating metal).

Step 6 – Lightly Grind Metal Surface
- Lightly grind the surface with either an Air Grinder and 80 Grit Grinding Disc or a Drill with 3 Inch 80 Grit Grinding Disc (when grinding, grind at slower speeds to reduce the amount of heat generated on the metal surface).
- Grind until all traces of the 2.2 mm Copper-Plated Stud disappear.

Step 7 – Featheredge and Apply Body Filler
- Featheredge / taper the paint out at least one inch around the dented area using either a DA Sander with 120 Grit Sandpaper Disc, a Drill with 3 Inch 120 Grit Sandpaper Disc or by hand with 120 Grit Production Paper and a Sanding Block.
- Mix Body Filler with Body Filler Hardener on a Mixing Board according to product directions (if not mixed properly you will have to remove and start over).
- Use a Body Filler Spreader to apply Body Filler as level as possible. The Body Filler will start to harden fairly quickly.

Step 8 – Use Surform File to Shape Body Filler
- Before the Body Filler hardens, use a Surform File (also called a cheese grater) to start shaping the Body Filler to match the contour of the vehicle surface.

Step 9 – Sand Body Filler and Surrounding Area
- After the Body Filler has hardened, use a DA Sander with 80 Grit Sandpaper Disk or Sanding Block with 80 Grit Production Paper to rough sand the Body Filler to match the contour of the vehicle surface.
- Switch to 180 Grit Production Paper to more finely sand the Body Filler to further match the contour of the vehicle surface.
- Dry sand the surrounding area by hand with 400 Grit Production Paper or wet sand by hand with 400 Grit Wetordry Paper.

Step 10 – Apply Primer
- Spray or Wipe the entire area with Wax and Grease Remover and wipe dry with a clean Disposable Wipe. This eliminates any built-up wax, grease, silicone, road tar, or other contamination before spraying
- Apply a light coat of Primer over the repair area.
- Allow Primer to dry about 2 to 3 minutes.
- Spray 2 to 3 additional medium wet coats of Primer over the repair area with a 2 to 3 minute flash off between coats (do not pile heavy coats of Primer on the repair area).
- Allow Primer dry a minimum of 20 minutes at 65° F and 85° F minutes before sanding.

Step 11 – Sand and Apply Color and Clear
- Once Primer has dried, sand Primer smooth by wet sanding with 800 Grit Wetordry Sandpaper or dry sanding with 600 Grit Production Sandpaper, or sanding by machine using a DA Sander and a 600 Grit Sanding Disc.
- Spray or Wipe the entire area with Wax and Grease Remover and wipe dry with a clean Disposable Wipe before spraying Base Color.
- Apply 2 to 3 medium wet coats of Base Color over the primed area until Primer is covered.
- Allow Base Color to dry 15 to 20 minutes (@ 70° F – longer for colder temperatures) before applying Clear.
- Apply 3 to 4 medium wet coats of Clear over the Base Color.
- Allow for a 2 to 3 minute flash off between coats (do not pile heavy coats of Clear).
- Allow the Clear to dry completely before removing tape and polishing.

Please be Advised
The recommendations and process steps listed in the projects below are general do-it-yourself recommendations that are designed to produce a successful project. Due to the many variables involved with each project and process steps, Touch Up Zone cannot guarantee results and does not accept liability for incorrect product application or use.
Before you Start
- Always wear proper safety protection: Safety Glasses, Respirator, Particle Mask, Latex or Nitrile Gloves and Hearing Protection (if you are using power tools that emit high noise levels).
- Utilize a well ventilated area when spraying coatings or sanding.
- Make sure the temperature is warm enough to allow coatings and materials to dry properly.
- Work in a well lighted area where you can clearly see what you are doing.
- Always follow label instructions on products.
Tools, Equipment, Paint and Material Options
The Tools, Equipment, Paint and Materials recommended for the each project are listed in the repair procedure and are highlighted in Red. You can purchase the Tools, Equipment, Paint and Materials for these products by clicking on the button below. For product definitions and general tech tips click here.
